Vibe coding promises a world where you describe what you want and AI builds it. And it delivers, but only if you follow the right practices. Without them, you burn credits, lose context, and end up with fragile code that breaks at the worst moment.
If you are new to the concept, read our complete guide to what vibe coding is before diving into the practices below. If you prefer a hands-on approach, start with our vibe coding for beginners guide before diving into the practices below. If you prefer a hands-on approach, start with our vibe coding for beginners guide before diving into the practices below. If you prefer a hands-on approach, start with our vibe coding for beginners guide before diving into the practices below. If you prefer a hands-on approach, start with our vibe coding for beginners guide before diving into the practices below.
These best practices come from building production applications with vibe coding tools daily. They are the lessons that separate developers who ship reliably from those who keep restarting from scratch.
Key Takeaways
- Breaking prompts into discrete steps, frontend, backend, database, auth, payments, prevents wasted credits and gives the AI precise context at every stage.
- Writing a Product Requirements Document before any prompt is the highest-leverage activity in vibe coding, turning vague requests into predictable, structured AI output.
- Use prototype tools like Lovable or V0 to generate your first frontend quickly, then immediately sync to GitHub and move to Cursor or Claude Code to avoid runaway costs.
- Validate at every step before building the next layer; catching a broken foundation early costs nothing, while finding it after five layers of AI-generated code can mean starting over.
- Claude Code offers the best quality-to-cost ratio for production work, with a higher usage ceiling per session than Cursor, though it requires investment to learn its terminal-first workflow.
- Treat all AI-generated code as a first draft that needs review, the most reliable vibe coders ship by catching security issues, logic errors, and edge cases before deployment.
Learn this hands-on
Ready to ship a real production app, not just pick a model? Check out the Master Course: Build and Ship a Production-Ready App with Lovable and Cursor.
1. Break Work Into Discrete Steps (Never One Giant Prompt)
The biggest mistake in vibe coding is trying to build everything in a single prompt.
Those "built in one afternoon" demos you see online are either prototypes being sold as finished products or timelines that skip the 80% of work that actually matters. AI coding works not because it is fast in one shot, but because it lets you move fast across a structured sequence of steps.
Here is the workflow that actually works:
- Generate the frontend first. Validate it.
- Build the backend. Validate it.
- Connect the database. Validate it.
- Add authentication. Validate it.
- Wire up payments. Validate it.
Each step gives the AI updated, precise context for the next one. That context is everything. Collapse all of these into a single mega-prompt and you lose visibility, control, and credits.
This matters financially too. Breaking work into discrete tasks lets you monitor AI usage in real time and catch errors before they compound. I learned this the hard way after burning through an entire V0 allocation in four prompts. Four. That was an expensive lesson.
Rule of thumb: If your prompt is longer than a short paragraph, you are probably trying to do too much at once. Split it into smaller steps with validation between each one.
2. Start With a PRD, Not a Prompt
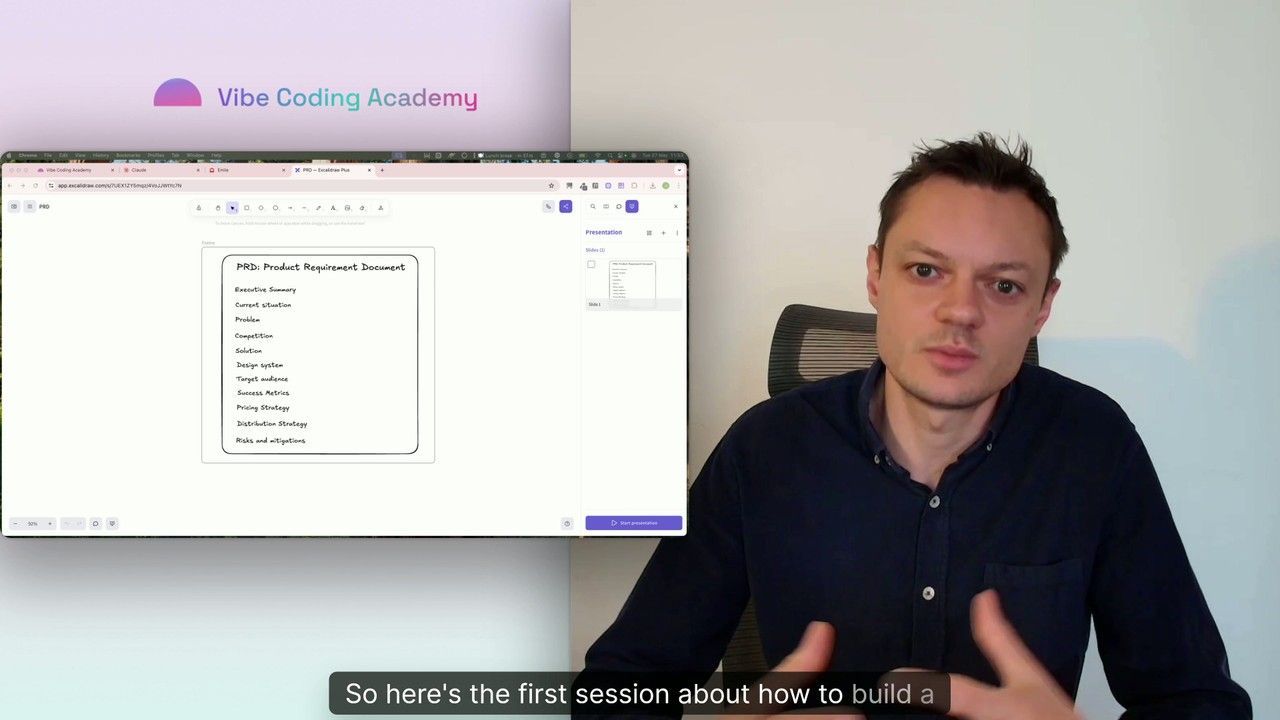
Before writing a single prompt, write a Product Requirements Document. This is not bureaucratic overhead, it is the single highest-leverage activity in vibe coding.
A good PRD includes:
- Core user flows, what does the user actually do?
- Data model, what information does the app store and how does it relate?
- Pages and navigation, what screens exist and how do users move between them?
- Design constraints, colors, typography, layout preferences
- Technical requirements, authentication method, database choice, deployment target
The PRD becomes your source of truth for every prompt you write. Instead of improvising each request, you reference specific sections. The AI gets clearer instructions, and you get more predictable output.
The difference between "build me a dashboard" and "build a coaching dashboard matching the PRD: 5 pages, stat cards with completion rates, weekly calendar color-coded by runner, session list with status badges" is the difference between three iterations and thirty.
3. Use Prototype Tools for Frontends, Then Move On
Starting with Figma frames is now a waste of time for most projects. The better question is whether to use a dedicated prototype tool like Lovable, Bolt, or V0 versus jumping straight into Claude Code or Cursor.
The current best practice: keep a prototype tool in your stack for the first version of your frontend. Both Lovable and V0 give you something tangible to react to quickly, which is the whole point of prototyping. To understand how these tools differ and when to use each, see our guide to AI prototyping tools and why specialization beats all-in-one.
But here is the critical warning: these tools get expensive fast. The moment you are satisfied with your first version, sync the code to GitHub immediately via Cursor before the credits pile up. Treat prototype tools as a launchpad, not a permanent home.
The workflow looks like this:
- Generate the initial frontend in Lovable or V0
- Iterate until the UI matches your vision
- Push to GitHub immediately
- Continue development in Cursor or Claude Code
Our series on [building a professional frontend prototype with Lovable, Bolt, or v0 If you want a faster entry point, our Lovable AI tutorial covers the essentials in a single read. If you want a faster entry point, our Lovable AI tutorial covers the essentials in a single read. If you want a faster entry point, our Lovable AI tutorial covers the essentials in a single read. If you want a faster entry point, our Lovable AI tutorial covers the essentials in a single read.](https://vibecodingacademy.ai/series/build-a-professional-frontend-prototype-with-lovable-bolt-or-v0) walks through exactly this approach step by step. Once the UI is locked in, this approach gives you the speed of AI prototyping without the ongoing cost of staying in an expensive generation environment.
4. Validate at Every Step
Every time you complete a step, frontend generation, backend setup, database connection, authentication, stop and validate before moving on.
Validation means:
- Does it actually work? Click through every flow, not just the happy path.
- Is the code clean? Open the generated files and scan for obvious issues.
- Does the data model make sense? Check that tables, relations, and constraints are correct.
- Are there security holes? Verify that API keys are server-side, auth is properly configured, and RLS policies are in place.
The cost of catching an error at step 2 is trivial. The cost of catching it at step 7, after five layers of AI-generated code have built on a broken foundation, can mean starting over entirely.
This is particularly important with AI-generated code because errors can be subtle. The application might look correct, pass basic tests, and still have a logic error buried three files deep. Validating early and often is the only reliable defense.
5. Claude Code Offers the Best Quality-to-Cost Ratio
After extensive testing across tools, Claude Code consistently delivers the best balance of output quality and cost efficiency for production-grade work. For a full breakdown of how it compares, read our Claude Code vs Cursor comparison.
When using top-tier models like Opus 4.6, you hit usage limits significantly faster in Cursor than in Claude Code, and the cost per session climbs without a proportional gain in output quality. The usage ceiling with Claude Code is simply higher for the same budget.
To be fair, Claude Code has trade-offs:
- Steeper learning curve, it is a terminal-first tool, not a visual IDE
- Model lock-in, you are limited to Anthropic's models, with no option to switch to OpenAI or Google for specific tasks
- Less visual feedback, no inline diffs or visual previews like Cursor offers
But once you have internalized the workflow, the results are stronger, the control is tighter, and the cost is lower. Our Cursor AI best practices guide covers how to get the most out of it. Our Cursor AI best practices guide covers how to get the most out of it. Our Cursor AI best practices guide covers how to get the most out of it. Our Cursor AI best practices guide covers how to get the most out of it. The key is investing the time upfront to learn the tool properly. Our series on mastering Claude Code to ship faster and build AI agents covers the full learning path.
6. Manage AI Costs Deliberately
AI is getting expensive, and that forces better habits. Most developers hit unexpected cost walls within their first month of heavy vibe coding.
The fix is deliberate model switching between tasks:
- Opus (or equivalent premium models): Architecture decisions, complex agent logic, and tasks where reasoning quality directly impacts output
- Sonnet (mid-tier): Standard feature implementation, code modifications, and well-defined tasks
- Haiku (lightweight): Repetitive operations, simple queries, and anything well-defined enough that a lighter model handles it cleanly
Setting up shell aliases or shortcuts to start sessions with specific models removes the friction from switching. The goal is to use the most powerful (and expensive) model only when the task genuinely requires it.
This also applies to prototype tools. Track your credit usage in real time. Know how many prompts you have left. Plan your iteration strategy around your budget, not the other way around.
7. Custom Commands and Subagents Are Powerful but Not Universal
Custom commands, subagents, skills, and MCP connections are transformative for repetitive, structured workflows. Automating SEO metadata generation, thumbnail creation, or deployment pipelines saves massive amounts of time.
But not every workflow converts cleanly to automation. Multi-step agent chains have a visibility problem: when an agent-to-agent pipeline breaks down, tracing where and why is painful. Running proper evaluations on multi-step flows is still a genuinely hard problem.
The best practice is to automate workflows that are well-defined and repetitive, and keep complex or creative tasks hands-on. The judgment of knowing which category a task falls into comes with experience.
8. Question Your Stack Regularly
The most underrated skill in vibe coding is not knowing which tools to use. It is knowing when to question the ones you have already picked.
The moment you get comfortable with a setup, something changes. A new model drops. A tool gets expensive. A workflow that worked at step one falls apart at step five. This is the nature of a rapidly evolving ecosystem. Staying current is easier when you have a solid [AI coding tools comparison to reference, or a dedicated vibe coding platforms compared breakdown when you are evaluating a full stack switch, or a dedicated vibe coding platforms compared breakdown when you are evaluating a full stack switch, or a dedicated vibe coding platforms compared breakdown when you are evaluating a full stack switch, or a dedicated vibe coding platforms compared breakdown when you are evaluating a full stack switch](https://vibecodingacademy.ai/blog/ai-coding-tools-comparison-2026).
The best vibe coding setups are not the ones that worked last month. They are the ones you are actively questioning right now.
Practical habits:
- Try new tools every few weeks. Even if you do not switch, you learn what is possible.
- Monitor costs across all your tools. Pricing changes frequently.
- Follow changelogs. Major updates can change which tool is best for a specific task.
- Talk to other builders. Everyone has different workflows, and comparing notes accelerates learning.
9. Treat AI Output as a First Draft
No matter how good the AI model is, treat every generated piece of code as a first draft that needs review.
This does not mean rewriting everything. It means:
- Reading the generated code to understand what it does
- Checking for security issues (exposed API keys, missing auth, SQL injection)
- Verifying that the logic matches your intent
- Looking for edge cases the AI might have missed
The developers who ship the most reliable vibe-coded applications are not the ones with the best prompts. They are the ones who review the output critically and catch issues before deployment.
If you are building with the vibe coding approach and want a structured path from idea to production, check out our master course: Build and Ship a Production-Ready App with Lovable and Cursor. If you want to compare all available learning paths first, explore all vibe coding courses to find the right fit. If you want to compare all available learning paths first, explore all vibe coding courses to find the right fit. If you want to compare all available learning paths first, explore all vibe coding courses to find the right fit. If you want to compare all available learning paths first, explore all vibe coding courses to find the right fit. It walks through the entire workflow step by step, applying every best practice covered in this article.
Conclusion
Vibe coding is not magic. It is a skill with learnable best practices that dramatically improve your results.
The core principles: break work into steps, validate constantly, manage costs deliberately, use the right tool for each task, and never stop questioning your setup. Follow these, and vibe coding becomes a reliable way to build and ship real applications.
Skip them, and you will spend more time debugging AI output than you would have spent writing the code yourself.
Start structured, stay curious, and ship often.